
Machine learning with the maximum of free GPU currently available plus the ability to keep a neat log of your data science experiments. Interested? My article shows a deep dive solution.
Quick summary
Colab, MLflow and papermill are individually great. Together they form a dream team.
Colab is great for running notebooks, MLflow keeps records of your results and papermill can parametrise a notebook, run it and save a copy.
All three are backed by top tier American companies, Colab by Google, MLflow by Databricks and papermill by Netflix.
Outline
Background and Motivation
Let me ask a few rhetorical questions (and give you my answers):
What’s your most comfortable way of running machine learning notebooks for experiments: Colab.
What’s your easiest way of running machine learning experiments where you need a decent size GPU: Colab.
What’s an elegant way of keeping track of ML experiments: MLfLow.
What’s a nice way of turning Jupyter-style ML notebooks into reproducible and loggable code : Papermill.
Code
My code is published on github, as usual:
https://github.com/hfwittmann/colab-mlflow-papermill
My code owes thanks to this repository (but without the Colab part):
https://github.com/floscha/papermill-mlflow-template
Prerequisites:
Requirements
Hardware
- A computer with at least 4 GB Ram
Software
- The computer can run on Linux, MacOS or Windows
- Familiarity with Python
- A Google Account. Included in the Google Account is access to Google Drive.
- Preferably a familiarity with Jupyter notebooks
- Preferably also a familiarity with one of the most famous machine learning libraries : scikit-learn and one of the the most famous machine learning data sets : the iris flower data set.
While the latter two “Preferablys” are not strictly necessary for the read, they make it certainly more enjoyable.
Let’s get started
The journey: a bird’s view
I would first like to show you the start and end points of our mission, so that you can better appreciate the beauty of the journey (this is meant metaphorically).
So we’ll take a look at the directory you start with and then the directory we end up with, and look at the differences. Also we’ll look at the interface that MLflow generates from the final directory.
This is the directory, as on github, in the clean pristine state. After we’ve run some experiments, it looks a bit different, as we’ll see below.
colab-mlflow-papermill
├── LICENSE
├── README.md
├── master.ipynb
├── minion.ipynb
└── util.py
(Remark; This tree-representation of the directory structure can be obtained using tree )
Walk through the directory
There are two Jupyter notebooks in there.
Remark. To run a Jupyter notebook you need a Jupyter server. You can run a Jupyter server locally, but alternatively and conveniently you can use your notebook in Google Colab, which runs its own servers. This is the alternative scenario we focus on in this post.
The two notebooks are: master.ipynb and minion.ipynb. The master notebook, as implied by the name, of course, drives the minion notebook. That’s to say we run the master notebook, which runs the minion notebook in turn, and here specifically it runs it 3 times, corresponding to the number of runs in our experiment. In our experiment we use the same dataset, but three different models – corresponding again to our runs.
Further, just to show it’s possible, we have some code in util.py which is “outsourced” from the minion Jupyter notebook, so as to reduce clutter.
Let’s look at an example of a “dirty” directory after a run of experiments:
colab-mlflow-papermill-dirty
├── LICENSE
├── README.md
├── master.ipynb
├── minion.ipynb
├── mlruns
│   └── 0
│       ├── a00197b6f6bd430f8e6655e5b6524108
│       │   ├── artifacts
│       │   │   ├── svm-2019-09-14\ 08:15:37.639082.ipynb
│       │   │   ├── svm.pkl
│       │   │   └── svm_confusion_matrix.png
│       │   ├── meta.yaml
│       │   ├── metrics
│       │   │   └── accuracy
│       │   ├── params
│       │   │   ├── dataset
│       │   │   └── model_name
│       │   └── tags
│       │       ├── mlflow.source.name
│       │       ├── mlflow.source.type
│       │       └── mlflow.user
│       ├── a2d26531bf524cacb5ba3ce231d4c062
│       │   ├── artifacts
│       │   │   ├── logistic_regression-2019-09-14\ 08:15:17.915289.ipynb
│       │   │   ├── logistic_regression.pkl
│       │   │   └── logistic_regression_confusion_matrix.png
│       │   ├── meta.yaml
│       │   ├── metrics
│       │   │   └── accuracy
│       │   ├── params
│       │   │   ├── dataset
│       │   │   └── model_name
│       │   └── tags
│       │       ├── mlflow.source.name
│       │       ├── mlflow.source.type
│       │       └── mlflow.user
│       ├── f8f7847633604a6a9bcf2e3c3b46545e
│       │   ├── artifacts
│       │   │   ├── decision_tree-2019-09-14\ 08:14:58.243246.ipynb
│       │   │   ├── decision_tree.pkl
│       │   │   └── decision_tree_confusion_matrix.png
│       │   ├── meta.yaml
│       │   ├── metrics
│       │   │   └── accuracy
│       │   ├── params
│       │   │   ├── dataset
│       │   │   └── model_name
│       │   └── tags
│       │       ├── mlflow.source.name
│       │       ├── mlflow.source.type
│       │       └── mlflow.user
│       └── meta.yaml
├── requirements.txt
├── artefacts_temporary_depot
│   ├── decision_tree-2019-09-14\ 08:14:58.243246.ipynb
│   ├── decision_tree.pkl
│   ├── decision_tree_confusion_matrix.png
│   ├── logistic_regression-2019-09-14\ 08:15:17.915289.ipynb
│   ├── logistic_regression.pkl
│   ├── logistic_regression_confusion_matrix.png
│   ├── svm-2019-09-14\ 08:15:37.639082.ipynb
│   ├── svm.pkl
│   └── svm_confusion_matrix.png
└── util.py
So what’s new in the “dirty” directory as compared to the pristine directory?
Viewed top-down, we’ve got a directory for temporary storage of artefacts (artefacts_temporary_depot) and the mlruns directory.
I now present a part of the mlruns directory, where I’ve put in some annotations (in round brackets).
colab-mlflow-papermill-dirty
...
├── mlruns (Top tier)
│ └── 0 (experiment)
│     ├── a00197b6f6bd430f8e6655e5b6524108 (run)
│     │ ├── artifacts
│     │ │ ├── svm-2019-09-14\ 08:15:37.639082.ipynb (artifact)
│     │ │ ├── svm.pkl(artifact)
│     │ │ └── svm_confusion_matrix.png(artifact)
│     │ ├── meta.yaml (description of the run)
│     │ ├── metrics
│     │ │ └── accuracy (metric)
│     │ ├── params
│     │ │ ├── dataset (param)
│     │ │ └── model_name (param)
│     │ └── tags
│     │     ├── mlflow.source.name (tag)
│     │     ├── mlflow.source.type (tag)
│     │     └── mlflow.user (tag)
....
The tags, params, metrics and artefacts are all items that the user (in this case : me) chose to persist. So eg I wanted a metric in there, namely accuracy, therefore we have a metric accuracy in the directory metrics.
The same goes for all the other items. Eg there is a figure svm_confusion_matrix.png, while svm.pkl. is a pickle of the fitted model that can be reused to make predictions.
The endpoint of the journey is the view MLflow can generate from the dirty directory.
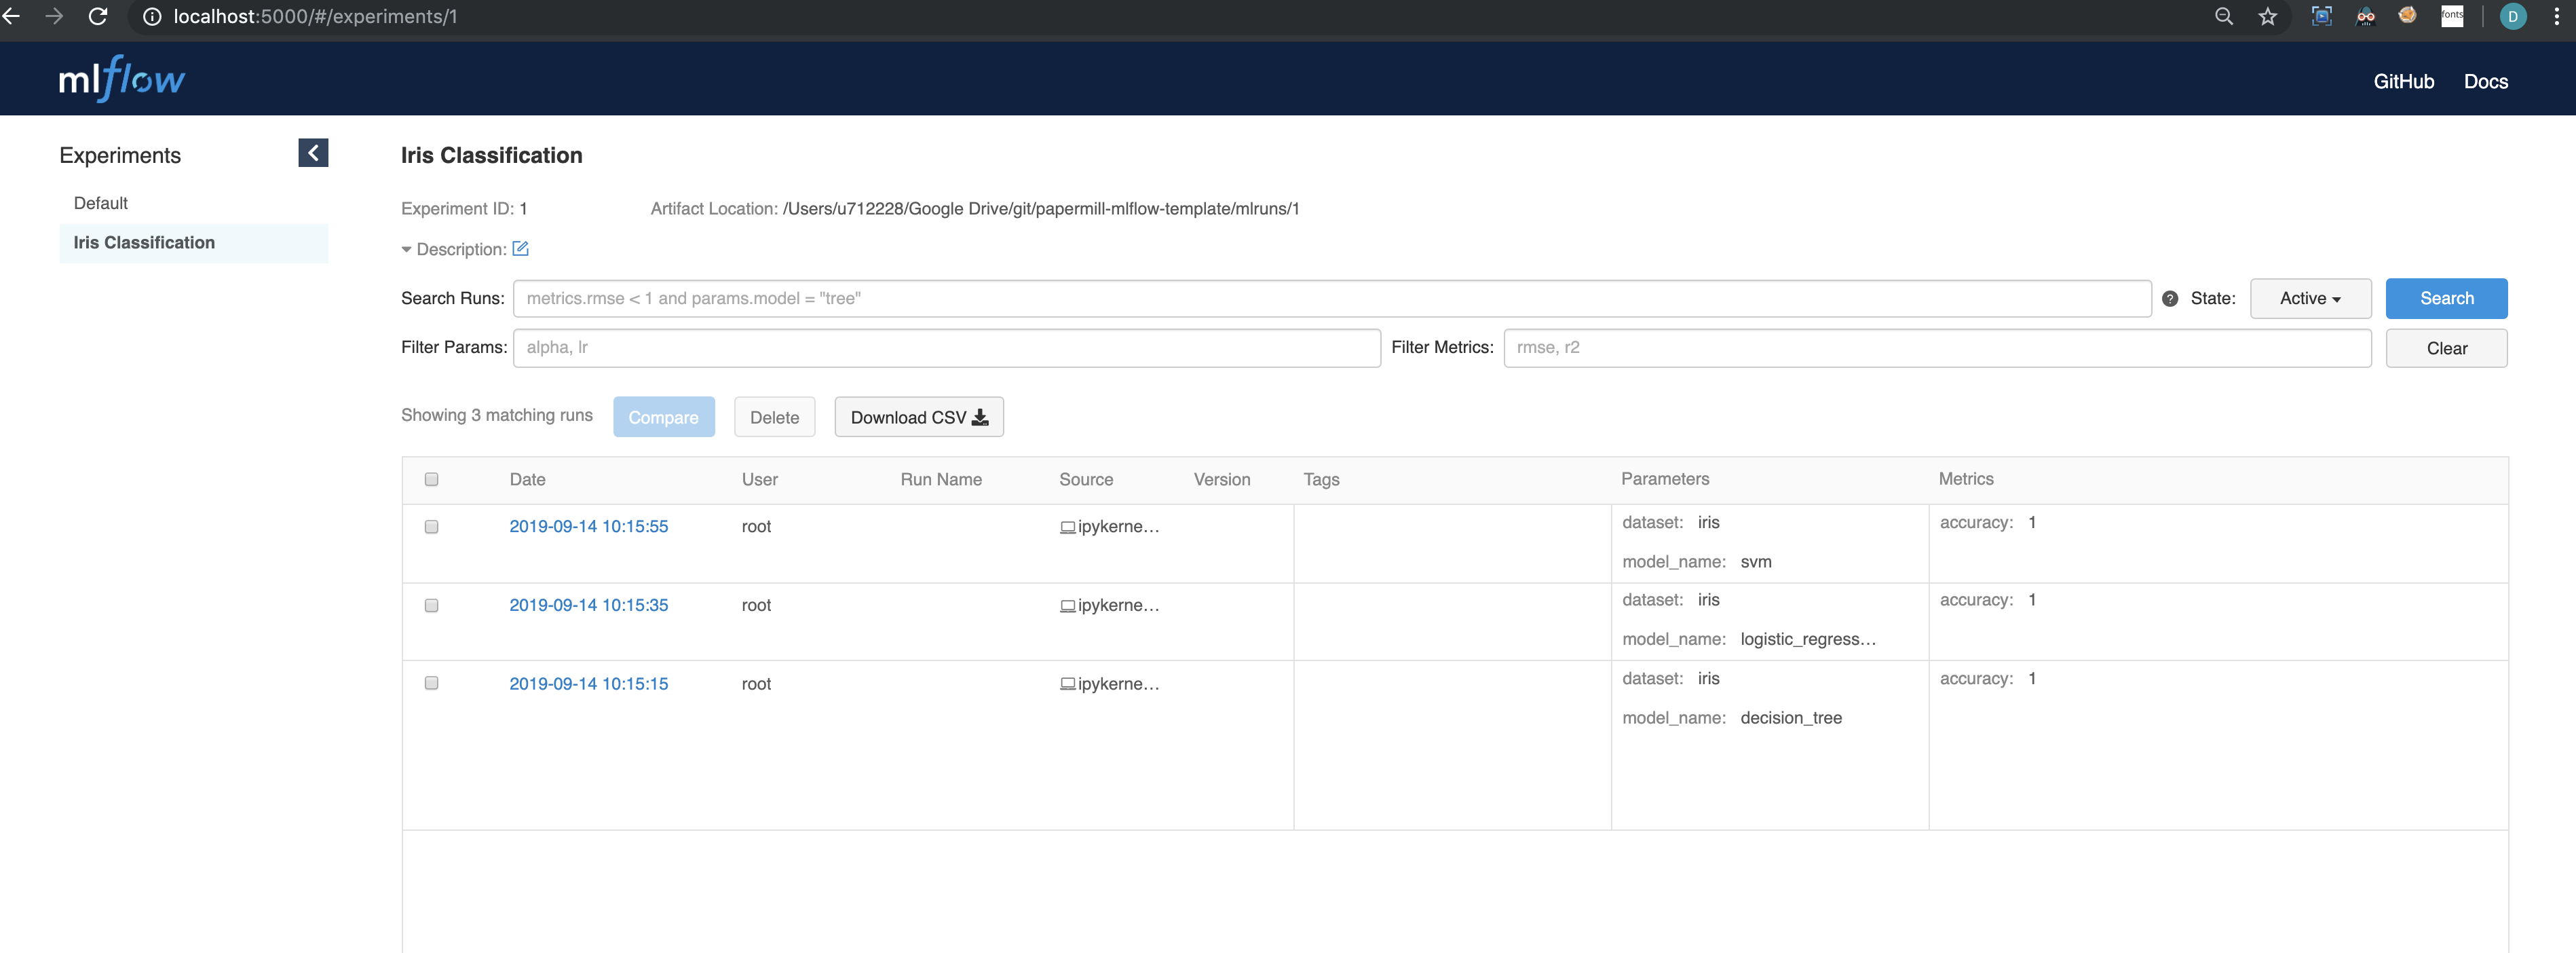
So what do we see here?
On the left hand side we see a list of experiments, in this case Iris Classification. In the main view you can see a table of the 3 runs of our experiment, with each run showing tags, params, metrics.
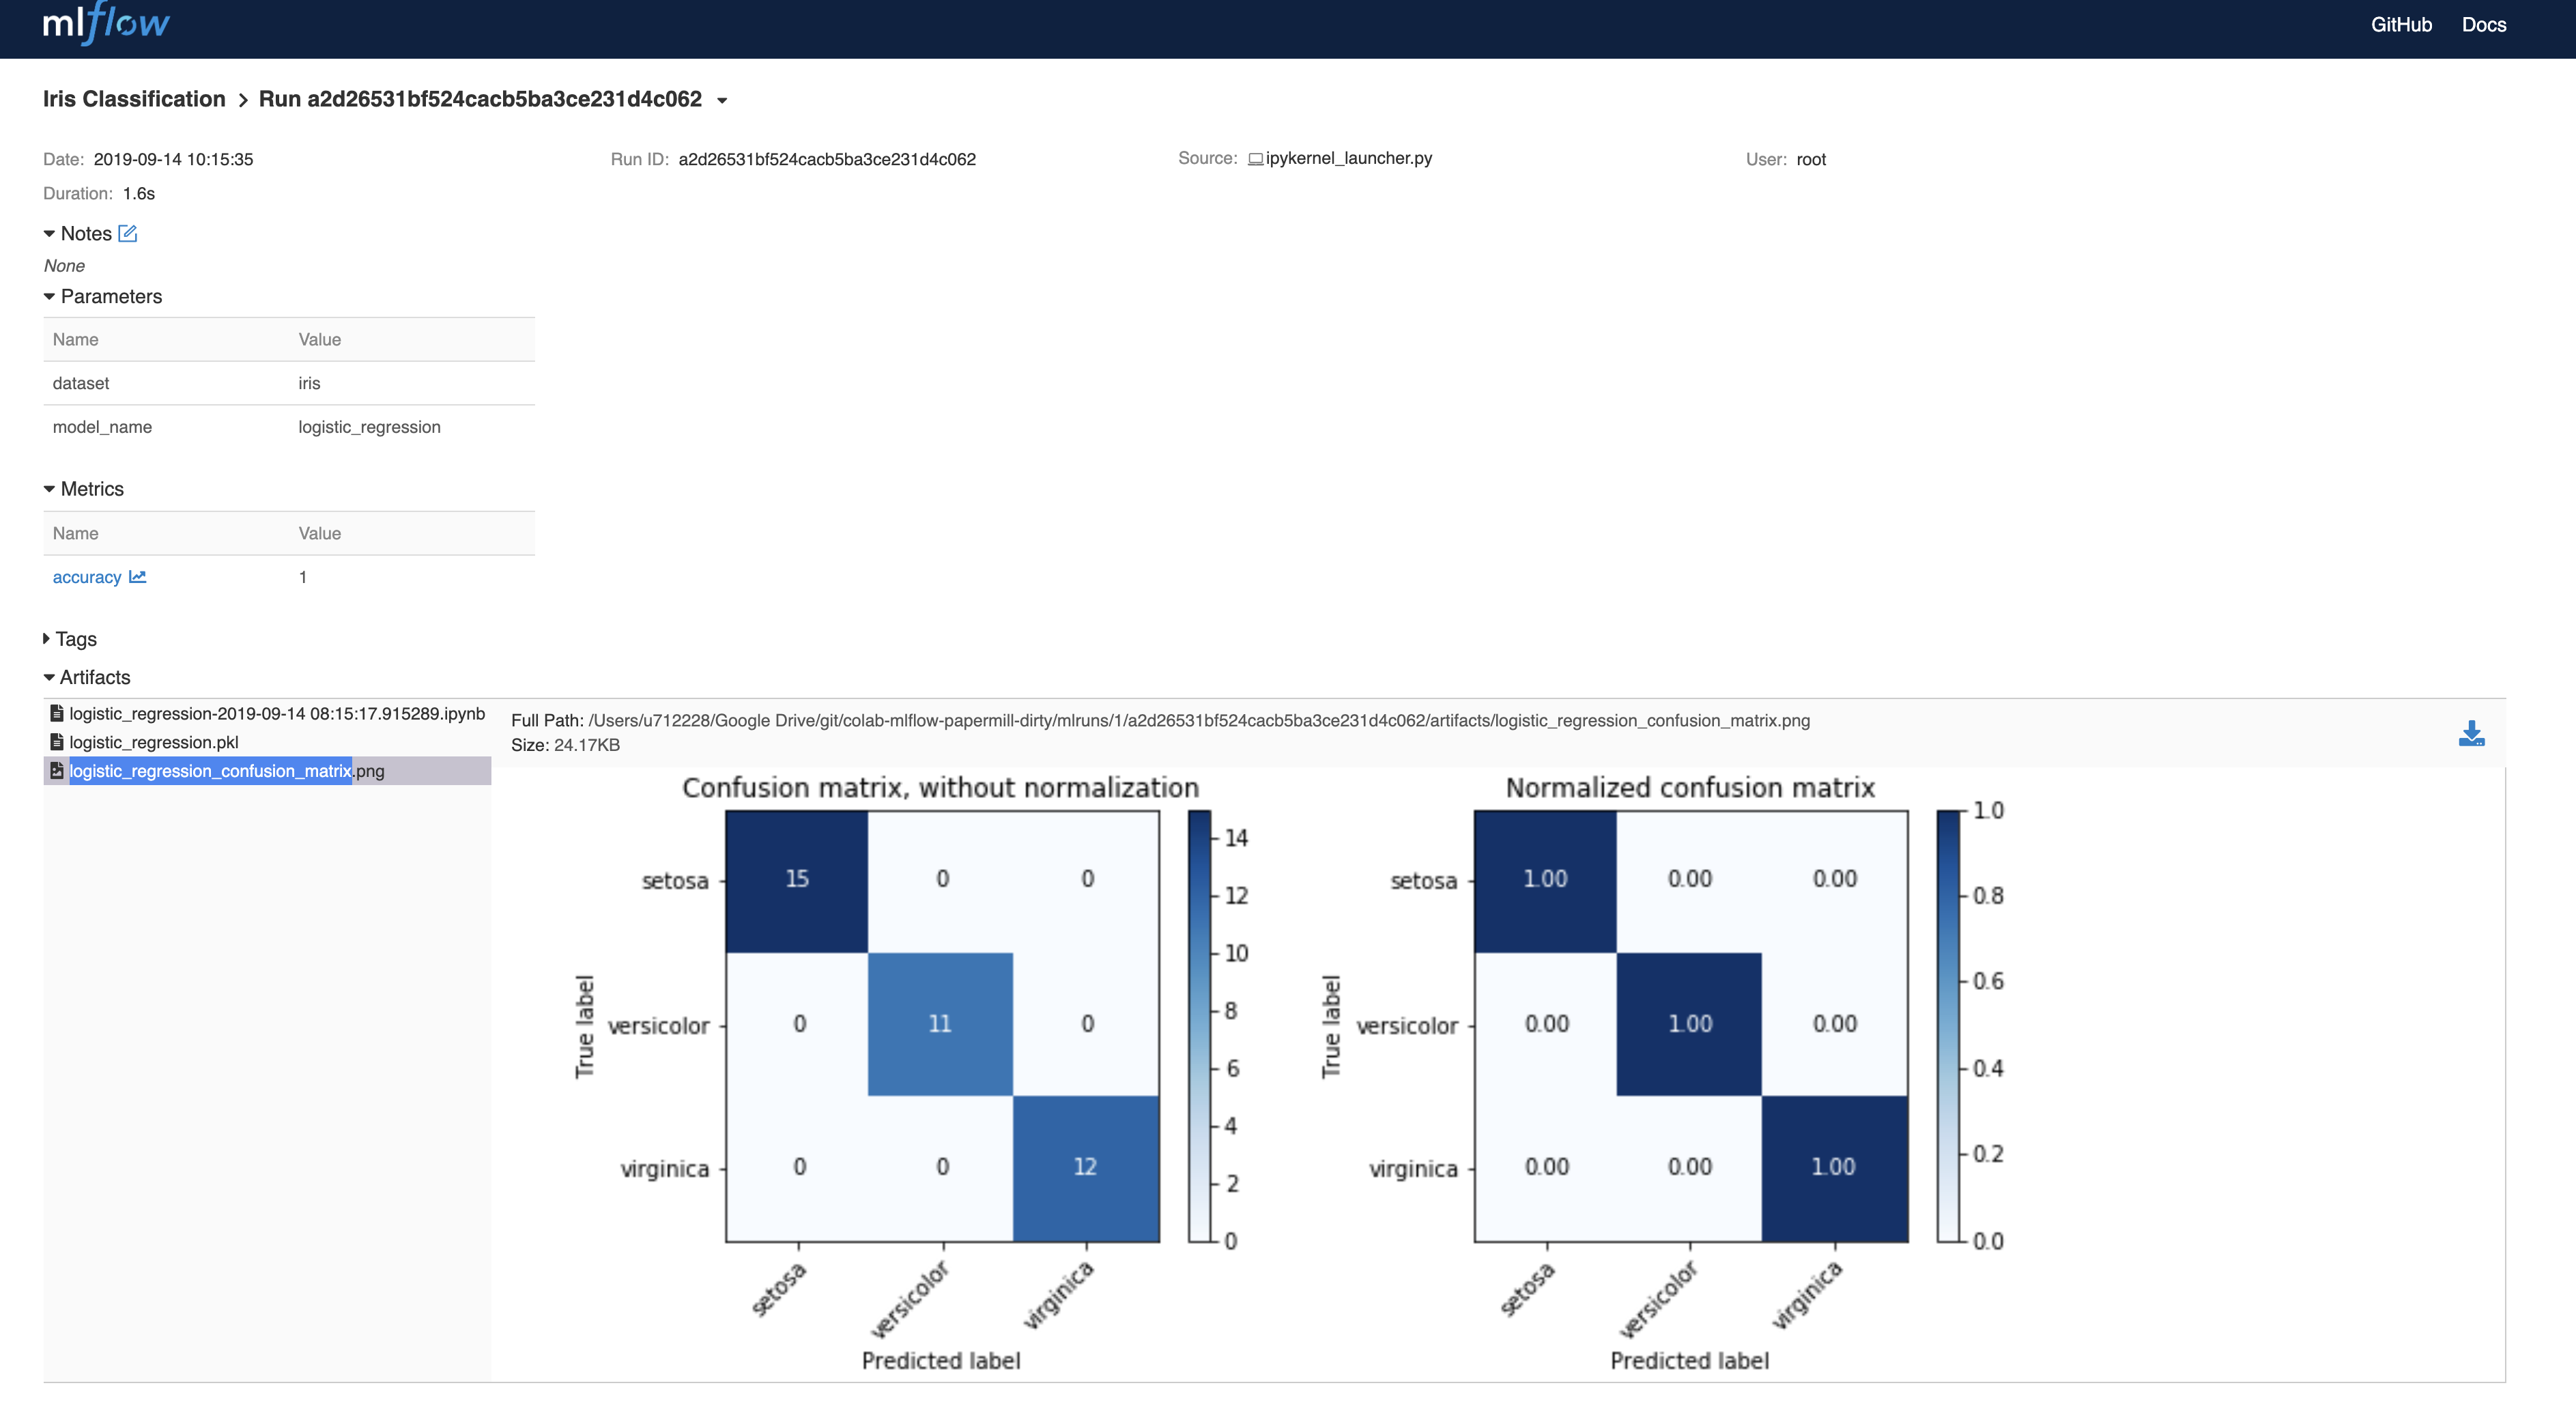
A click onto one of the runs reveals the following view. Additionally to the main view you can now see the artefacts. This includes figures, but also the pickled model and the versioned notebook generated by papermill.
What are the steps to arrive there?
First we save stuff in the artefacts_temporary_depot directory, then we use MLflow to save the files from the artefacts_temporary_depot directory as artefacts. Artefacts are an MLflow term that can mean anything which is generated during a run of an experiment, such as a diagram. Once generated, it can be designated an artefact, which means that a copy of it is made in a directory associated with the experimental run. The designation as an artefact is done from within the minion notebook.
Making the journey
The first thing you should do, is find out, how you can mount your Google Drive on your local machine. This is required because later on you will run MLflow locally. There are already good write-ups about that. I give three references:
- On a Mac: https://iboysoft.com/mac-drive-manager/cloud-mounter/mount-google-drive-on-mac.html
- On Ubuntu Linux: https://vitux.com/how-to-access-your-google-drive-account-in-ubuntu/
- On Windows or a Mac: https://support.google.com/drive/answer/2374987
We assume that you’ve followed the relevant guide. By now you should have a subdirectory Google Drive in your local Home Folder, with the contents of your Google Drive already synched.
Another way of accessing Google Drive that you should be familiar with, is via using your browser:
https://support.google.com/drive/answer/2423485?hl=en
Let’s now walk through the master notebook:
- Set up google drive access
from google.colab import drive
drive.mount('/content/gdrive')
This allows the notebook access to Google Drive. Subsequently you’ll be asked to authenticate yourself to Google and allow the Colab App access to Google Drive.
See screenshots.
![]()
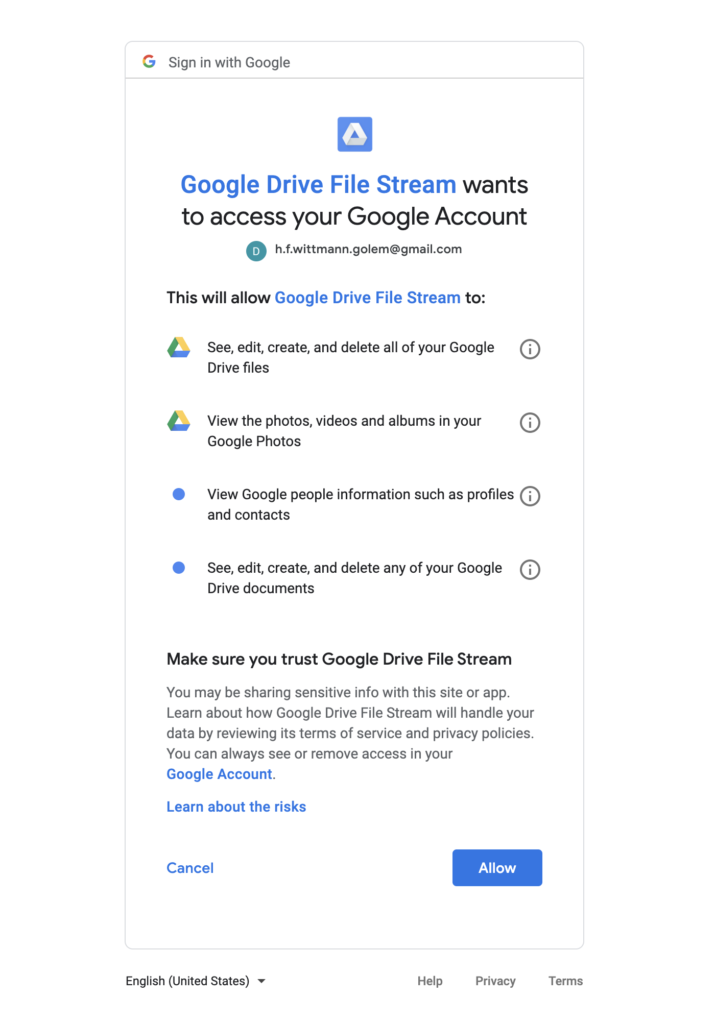
Once you’ve done this, Google Drive is now mounted in the notebook.
- Go to directory
Make sure this is the directory corresponding to that on your local drive! If you’ve git cloned the repository into your local Google Drive then the cd is correct!
Example:
-
- Local : <Homedirectory>/Google Drive/git/colab-mlflow-papermill
- Google Drive: /content/gdrive/My\ Drive/git/colab-mlflow-papermill
Remark : <Homedirectory> looks different on different operating systems.
- Install missing packages
Google Colab comes with a host of packages preinstalled. However sometimes you need a different version of a package, or sometimes even an entirely new one.
This does not present a problem, as you can easily install new packages in Google Colab. When you restart the notebook, as is sometimes necessary after an install or a crash, the packages are kept. Therefore it is advisory to check whether the package is already installed. This is done by this code block.
import importlib

if importlib.util.find_spec('mlflow') is None:
  !pip install mlflow

if importlib.util.find_spec('papermill') is None:
  !pip install papermill
# !pip install -r requirements.txt
- Import packages
# import packages
import os
import pandas as pd

import papermill as pm
import mlflow
We now import the packages necessary for the operation of the master notebook. These include mlflow and papermill.
- Create artefacts_temporary_depot directory and create mlflow experiment
# Create directory for temporary storage of artefacts and

artefacts_temp_dir = 'artefacts_temporary_depot'
if not os.path.exists(artefacts_temp_dir):
    os.makedirs(artefacts_temp_dir)
The directory for temporary storage of artefacts is necessary for mlflow’s handling of its artefacts.
# create mlflow experiment
mlflow.create_experiment('Iris Classification')
We create an experiment, to know what we are doing later. An experiment is to runs, what a book is to chapters.
Run models using papermill
model_list = ['decision_tree', 'logistic_regression', 'svm']

for model_name in model_list:
    print(f"Running {model_name!r} model")

    now = str(pd.to_datetime('now'))
    notebook_out = f'{artefacts_temp_dir}/{model_name}-{now}.ipynb'

    parameters = {'model_name': model_name,
              'notebook_out': notebook_out,
              'artefacts_temp_dir': artefacts_temp_dir
             }

    pm.execute_notebook(
        input_path = 'minion.ipynb',
        output_path = notebook_out,
        parameters = parameters
    )
So in this we
-
- define the models that we want to test (line 1).
- define the name of run-through-notebook produced by papermill. The name includes a timestamp for easy identification (line7).
- finally we execute the notebook using papermill functionality (line 14).
Let’s now look at the minion notebook:
Generally the minion notebook is very straightforward. Here we concentrate on a few salient aspects.
-
Metadata tag parameters
To run the parametrised minion notebook in papermill, it is necessary to include a metadata tag. This section is the section below the heading parameters, which is seemingly empty.
https://papermill.readthedocs.io/en/latest/usage-parameterize.html
Unfortunately, at this point this cannot be edited in colab directly, but can easily be edited in Jupyter (by running your local server). However, this metadata tag only has to be added to the notebook once, and it is already included in the minion notebook. So you’re fine to go.
- Set MLfow Experiment
mlflow.set_experiment('Iris Classification')
This is done, so that we know which experiment this run belongs to.
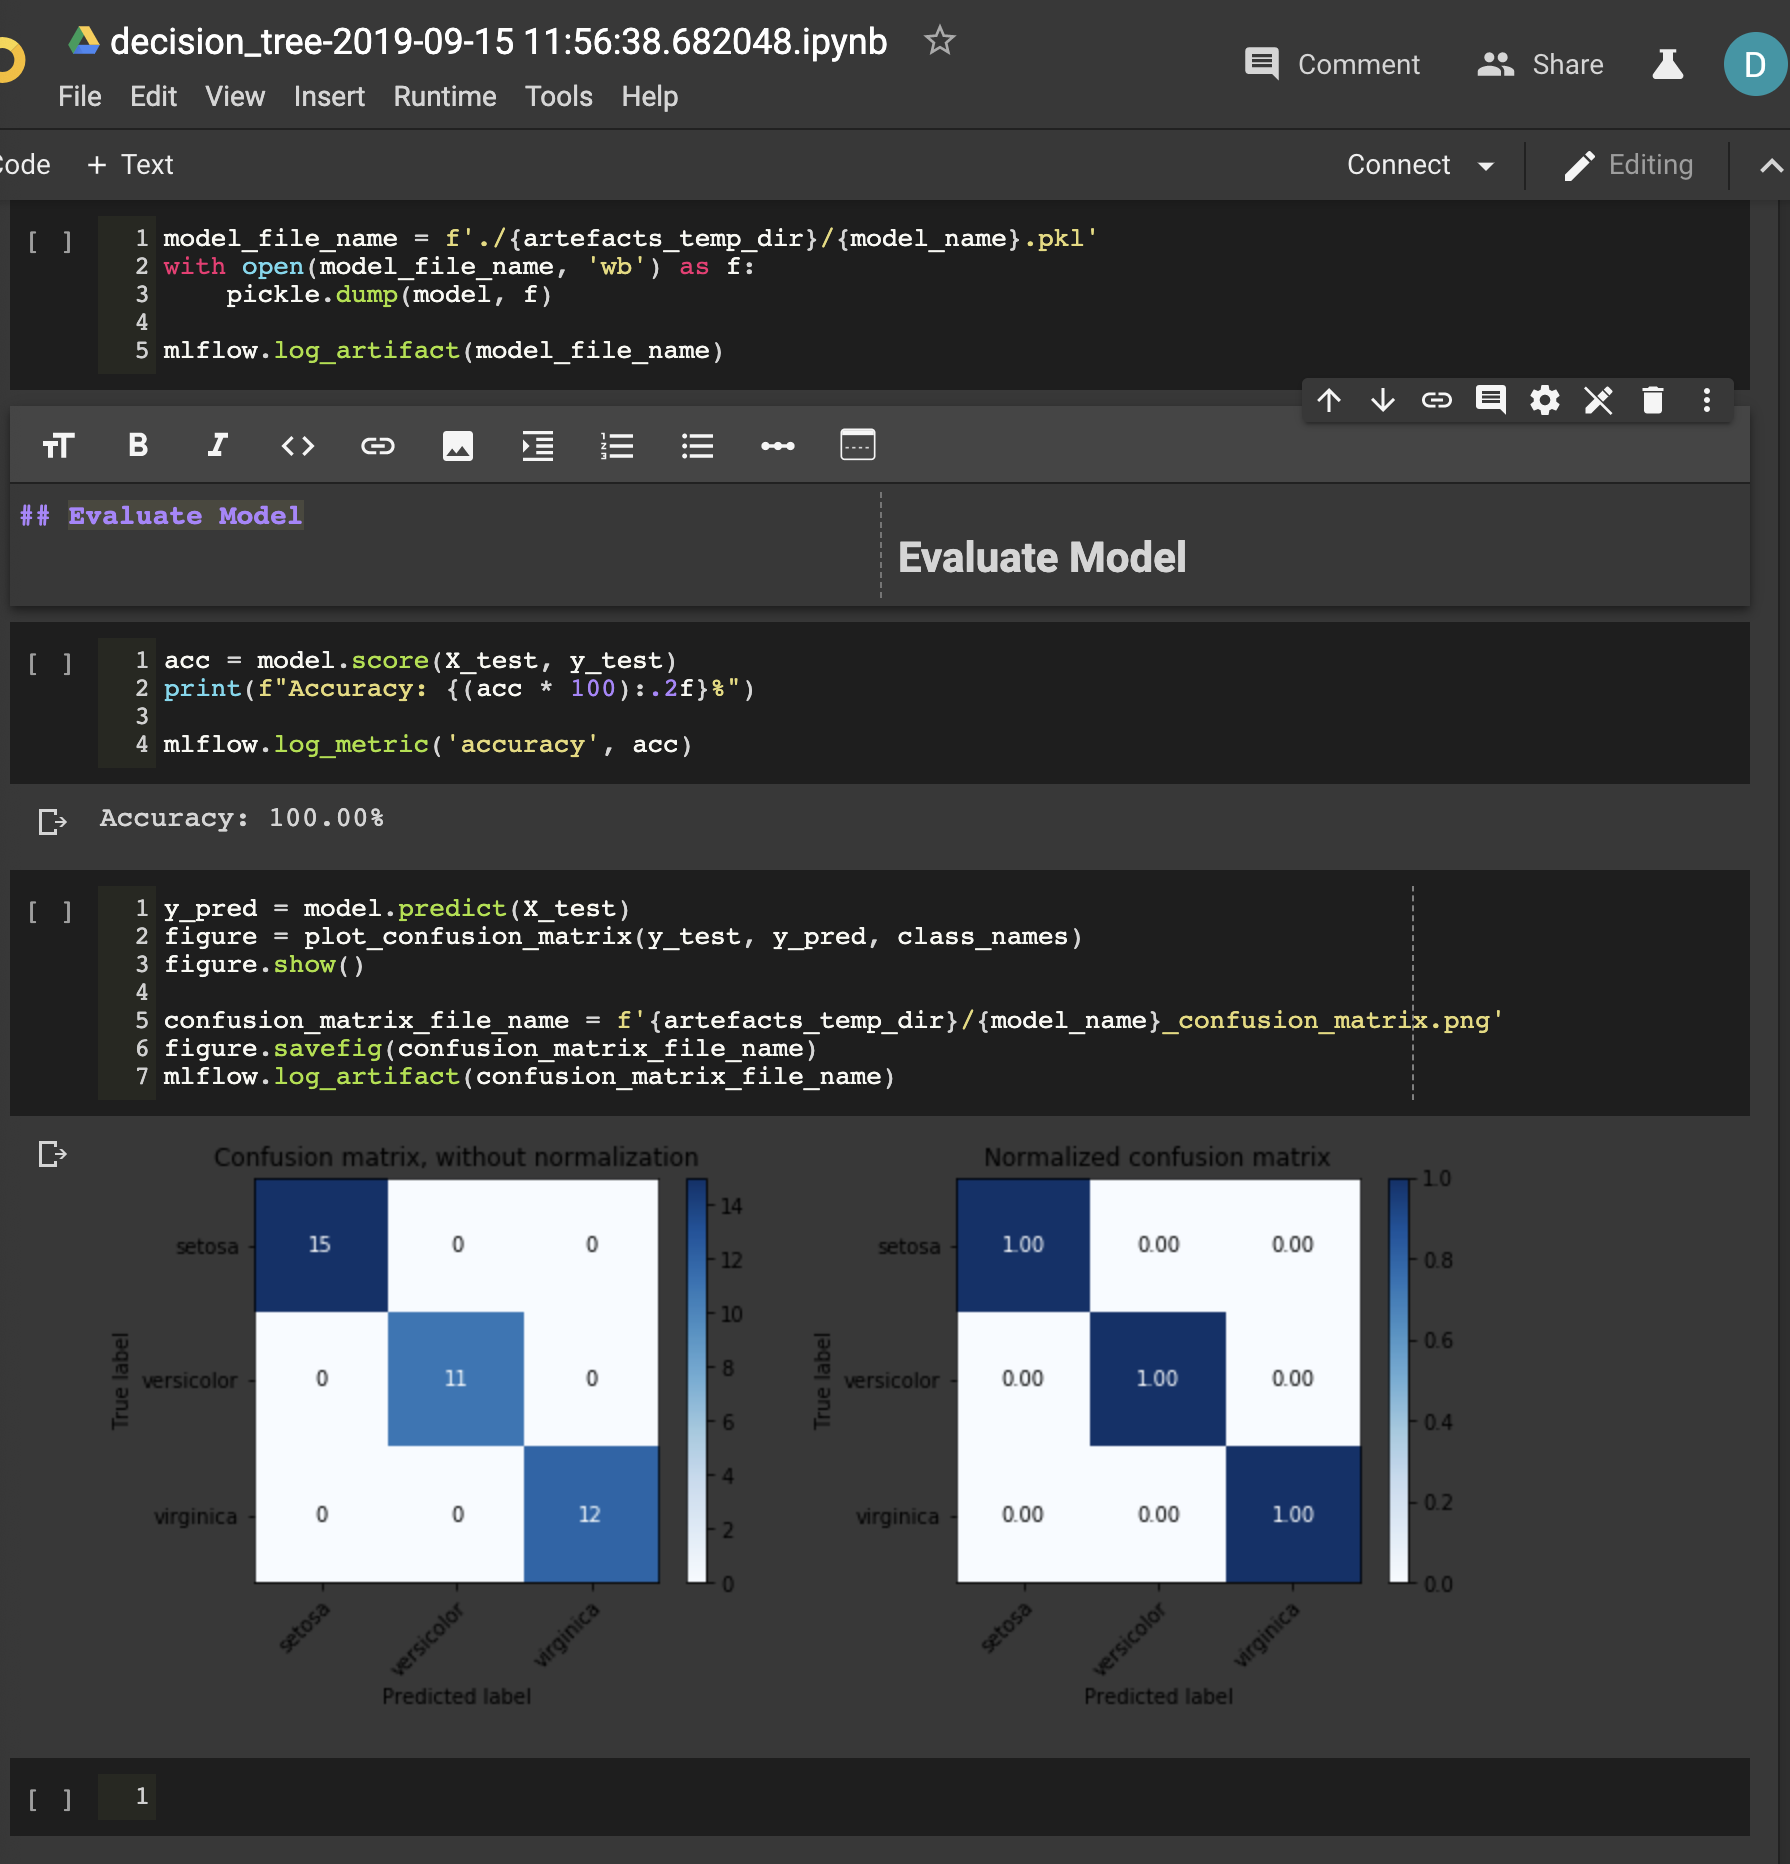
We take a look at an example notebook, in this case corresponding to the run of the decision-tree model. You can see that the state of the notebook has been preserved by papermill: The value for the accuracy is there, as are the confusion matrix figures.
Mlflow ui
By now you should have the dirty directory with all the results of the experimental runs in place.
When you start your mlflow ui server with
mlflow ui
You will now have the results right at your fingertips.
Remark: it may happen that an instance of mlflow ui is still running. On linux you can stop it like this:
kill $(ps aux | grep ‘mlflow’ | awk ‘{print $2}’)
Summary:
We showed how Colab, MLflow and papermill can play together as a dream team.
Further we list a few of the tricks that were shown in this article.
Tricks of the trade
Google Drive
- Using Google Drive (on a MacBook)
Colab
- Using Google Drive (on a MacBook)
- Using packages that are not preinstalled on Google Colab
Papermill
- Metadata tag in google colab
Mlflow
- saving notebook as an artefact (after it’s run, so that all the content generated during a run is already in there)
-
make_metafiles_local