
The previous post was already about dash. So why return to the subject? In some ways I got carried away by the possibilities of dash. I therefore included some concepts that are nice, by themselves, however introduce a level of complexity that is not fully necessary to start you first deployment. This post is really aimed at people who found the previous post too demanding, and want a more gentle introduction to deploying dash with docker.
Additionally there gonna be a stronger focus on infrastructure, in particular how to add ssl encryption and a basic login.
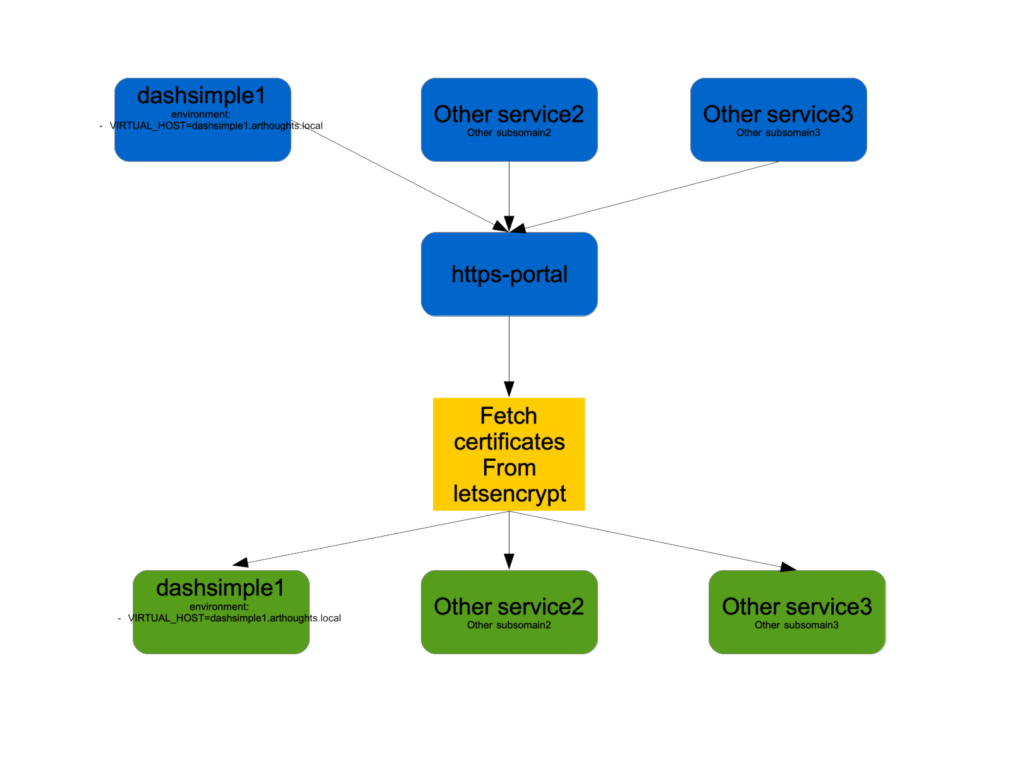
So here’s an image of what we’re going to build:

Here’s the full-width view : http://dashsimple4.arthought.com
The login credentials are:
user
word
As you can see already, this is a very simple page.
The code can be found in the following github repository: https://github.com/hfwittmann/dash
The dashboard can be found under this link: https://dashsimple4.arthought.com/
What’s in the dashboard?
The dashboard’s purpose is to be very simple. It shows two barcharts containing the same data.
Requirements
Hardware
- A computer with at least 4 GB Ram
Software
- The computer can run on Linux, MacOS or Windows
- Should have docker-compose installed
- Familiarity with Python, preferentially flask
- Basic understanding of docker
- Basic familiarity with webtechnologies
Detail
The three plots shown in the dashboard are
- Two barcharts with artificial data
Useful links
http://nginx.org/en/docs/http/ngx_http_auth_basic_module.html#auth_basic
http://www.htaccesstools.com/htpasswd-generator/
https://github.com/SteveLTN/https-portal#override-nginx-configuration-files
Code
… for local deployment
The code we present will focus on using a local server with the address being localhost.
There are 4 files to get this up and running : requirements-simple.txt, dockerfile-simple, docker-compose-simple.yml and app-simple.py.
And here are the file definitions:
- requirements-simple.txt
dash
dash-renderer
dash-core-components
dash-html-components
dash-table-experimentS
plotly
- dockerfile-simple
FROM python:3

COPY requirements-simple.txt /
RUN pip install -r /requirements-simple.txt

RUN mkdir /myworkdir
WORKDIR /myworkdir
COPY ./ ./

EXPOSE 8050
CMD ["python", "./app-simple.py"]
- docker-compose-simple.yml
version: '3.1'

services:

  https-portal:
    image: steveltn/https-portal:1
    ports:
      - '80:80'
      - '443:443'

    links:
      - dashsimple1
    restart: always

    environment:
      DOMAINS: '
      user:word@dashsimple1.arthoughts.local -> http://dashsimple1:8050
      '
      STAGE: local
      FORCE_RENEW: 'false'

  dashsimple1:
    build:

      context: ./
      dockerfile: dockerfile-simple
    environment:
      - VIRTUAL_HOST=dashsimple1.arthoughts.local
Remark: “- & gt;” should be replaced by an arrow pointing to the left -> The rendering is incorrect …
- app-simple.py
# -*- coding: utf-8 -*-
import dash
import dash_core_components as dcc
import dash_html_components as html

external_stylesheets = ['https://codepen.io/chriddyp/pen/bWLwgP.css']

app = dash.Dash(__name__, external_stylesheets=external_stylesheets)

app.scripts.config.serve_locally=True


app.layout = html.Div(children=[
    html.H1(children='Hello User, wünsche schönes ..'),

    html.Div(children='''
        Dash: A web application framework for Python.
    '''),

    dcc.Graph(
        id='example-graph',
        figure={
            'data': [
                {'x': [1, 2, 3], 'y': [4, 1, 2], 'type': 'bar', 'name': 'SF'},
                {'x': [1, 2, 3], 'y': [2, 4, 5], 'type': 'bar', 'name': u'Montréal'},
            ],
            'layout': {
                'title': 'Dash Data Visualization'
            }
        }
    )
])

if __name__ == '__main__':
    app.run_server(host="0.0.0.0", debug=True)
Let’s walk through those
- requirements-simple.txt: .. specifies which python packages are to be installed inside the docker container. These packages include inter alia the dash packages, the plotly package. The requirements file has a simple purpose: to keep the dockerfile-simple clean. The implementation here has the advantage that it helps to speed up build times during development. The reason is that code changes in the main meat of the program, i.e. app-simple.py , don’t necessitate and effectuate the repeated downloading of the python packages specified in the requirements-simple.txt file. This is because docker can recognize if/that the requirement file has not changed.
- dockerfile-simple : the docker build file. It specifies that the contents of the requirements-simple.txt file, assumed to be residing in the same folder, are to be copied inside of the docker container. Then a pip command is run to install the packages. Furthermore a directory named myworkdir is created inside the container. It is defined as the working directory. The contents of the current directory are then copied inside the container’s working directory. The port 8050 is exposed to the command python ./app-simple.py”
- docker-compose-simple.yml : This docker-compose-file is used to define the use of the docker-file. It is not necessary to pass on the port to the outside of the container using the same port number 8050, as this task is already covered by the component https-portal
- image: steveltn/https-portal:1. This tells docker to make use of steveltn/https-portal:1. The source of the image is at github https://github.com/SteveLTN/https-portal. steveltn/https-portal allows to automatically create ssl-encryption for an existing service or site. The certificates are created and renewed automatically via let’s encrypt.
- links: this declares a dependence on the dashsimple1 service which is defined further below in the docker-compose-simple.yml file.
- the environment section uses the ideosyncratic syntax of the steveltn/https-portal package. Multiple site maybe specified as a comma seperated list. user:word@dashsimple1.arthoughts.local indicates that basic authentication should be used on this subdomain. This subdomain name must also be references in environment section of the corresponding service, which in the dashsimple1 service is given as environment: – VIRTUAL_HOST=dashsimple1.arthoughts.local
- STAGE: local This is for the local mode. There is also staging and production.
- FORCE_RENEW: ‘false’. These settings for STAGE and FORCE_RENEW are used as a precaution, as Let’s encrypt imposes certain limits, as to how often the certificates maybe renewed https://github.com/SteveLTN/https-portal#about-rate-limits-of-lets-encrypt. In production
- app.simple.py: initially we import the dash related packages. Then we define some styles. Further we define offline usage: cf https://github.com/plotly/dash/issues/46. Then the app is initialised. Subsequently the layout is defined. In the layout there are html elements such as
- html.H1(children=’Hello User, wünsche schönes ..’),
- html.Div(children=”’
Dash: A web application framework for Python.
”’), - and graphs indicated by dcc.Graph. In this case there is only one graph/figure
Remarks: You have to make sure, that you are using the latest version of steveltn/https-portal, otherwise the basic authentication scheme is not going to work: https://github.com/SteveLTN/https-portal/issues/142
So this concludes our post.