
So now we’re ready to deploy our own custom R Shiny server with caching.
We had previously already discussed the pros and cons of
- hosting your own server, by this we mean a docker based server in the cloud
- Signing up at https://www.shinyapps.io/
See this https://arthought.com/r-shiny-stock-analysis. Then we had opted for option 2, mainly to avoid complexity. We chose the free plan option, however there is a fairly tight limit on the number of hours the free-plan shinyapps.io based apps will run. On the other hand, the non-free shinyapps.io pricing options, while very practical, might be a stretch for some people’s budget, the starter package is currently at 9$/month.
Therefore in this post we deploy a server on digital ocean on the smallest droplet, which currently is at 5$/month. This is a link to the digital ocean pricing options.
We want to achieve the same functionality as the already mentioned predecessor post, namely plotting various analyses of a DAX-stock vs the DAX index itself.
In order for this to work as smoothly as possible we make use of caching, as discussed previously.
The app code can be found on github.
The other part of this post concerns how to spin up the docker based RShiny server, the necessary files are also on github.
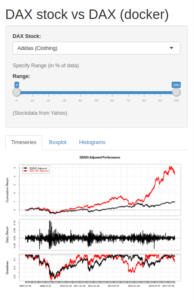
Bear in mind that I might not run the demo-server indefinitely, or that it might not be responsive, so first here’s a screenshot:
Second here’s the demo (this might take a few seconds to load, after all this is only on a 5$/month plan) :
Let’s discuss the changes in the app code, then turn to the docker definition files.
If you want to see this in a full page view here’s the link.
We have outsourced the job of fetching the data from the web ( which is the component’s list and the financial data) to two external files getDAX_components.R and getTimeseries.R.
Changes in the Shiny Server definition files ui.R and server.R
The changes in the ui.R are shown here:
  source('./subs/getDAX_components.R')
  source('./subs/getTimeseries.R')

  ## Initialization

    {## get dax components names

      # saved under DAX.components.Symbol
      cache.components = data.cache(function() datafeed_components() , cache.dir = "./cache", cache.name = 'components', frequency = weekly, wait = FALSE)

    } # {## get dax components names
  # end: ## Initialization
So we source the two external files getDAX_components.R and getTimeseries.R. Then we call datafeed_components() inside the function data.cache. Owing to the definition of datafeed_components this causes the DAX components list to be saved under DAX.components.Symbol.
In server.R we find two data.cache calls:
      # get DAX data
      varName1 = '^GDAXI'
      cache.stockdata = data.cache(function() datafeed_timeseries(varName1) , cache.dir = "./cache", cache.name = varName1, frequency = daily, wait = FALSE)

      # get stock data
      varName2 = input$stock_id
      cache.stockdata = data.cache(function() datafeed_timeseries(varName2) , cache.dir = "./cache" , cache.name = varName2, frequency = daily, wait = FALSE)
The first call causes the DAX index data to be saved in the variable stockdata.^GDAXI, the second call causes the selected stock’s data to be saved in the variable paste0(‘stockdata.’, input$stock_id) if input$stock_id is e.g. ALV.DE the data is saved under stockdata.ALV.DE.
Let’s take a lock at the docker files:
In the docker-compose-r-shiny.yaml there are 4 points I would like to draw your attention to:
- The files uses steveltn/https-portal:1 which provides free https encryption from let’s encrypt using a nginx server, you find more on that here.
- You need to change shiny.example.com to fit what you have.
- The yaml references a custom build which is based on image: rocker/shiny. The reason for using a separate build file, which is discussed in more detail below, is that we need some additional preinstalled R-packages.
- One can easily extend this by putting e.g. rstudio or wordpress on the same server. However we want to use the smallest digital ocean droplet, so having shiny on the server is quite enough.
This is the yaml
version: '3.1'

services:

  https-portal:
    image: steveltn/https-portal:1
    ports:
      - '80:80'
      - '443:443'
    links:
      - shiny
    restart: always
    environment:
      DOMAINS: 'shiny.example.com -> http://shiny'
      STAGE:  staging # production # local #
      FORCE_RENEW: 'false'
    volumes:
      - /var/run/docker.sock:/var/run/docker.sock:ro

  shiny:
    build:
      context: ./build
      dockerfile: myDockerfile
    # image: rocker/shiny
    container_name: shiny
    restart: unless-stopped
    environment:
      - VIRTUAL_HOST=shiny.example.com
    volumes:
      - /shiny_deploy_apps/:/srv/shiny-server/
      - shinylog:/var/log/
      - shinyhome:/home/shiny/

volumes:
  db_data:
  upload:
  shinylog:
  shinyhome:
As for the build file these points I consider noteworthy:
- The build file is based on the image rocker/shiny:latest
- The whole point about using this separate build file, as opposed to just referencing the image via image: rocker/shiny, is installing some extra R-packages
- In Debian/Ubuntu systems some R-packages are available as prebuilt packages and can be installed via apt. For those packages we generally prefer this way of installing, since it’s faster and less memory intensive.
- For the packages r-cran-testthat r-cran-lubridate prebuilt packages are available, therefore we install them via apt.
- The packages ‘quantmod’, ‘PerformanceAnalytics’, ‘htmltab’, ‘devtools’ we install from source via CRAN, and ‘jbryer/DataCache’ from source via github.
- There are some more sophisticated ways of deciding whether to install via apt or from source, see this reference. For now our simple approach is enough.
The build file looks like this:
FROM rocker/shiny:latest

# Install dependencies and Download and install shiny server
RUN apt-get update && \
    apt-get install -y -t unstable && \
    apt-get install -y libssl-dev libxml2-dev r-cran-testthat r-cran-lubridate # these are necessary for the R-packages htmltab, devtools

RUN echo ' list.of.packages <- c("devtools", "install.load") ' > /tmp/packages.R && \
    echo ' new.packages <- list.of.packages[!(list.of.packages %in% installed.packages()[,"Package"])] ' >> /tmp/packages.R && \
    echo ' if(length(new.packages)) install.packages(new.packages) ' >> /tmp/packages.R && \
    Rscript /tmp/packages.R

# Now use devtools and install.load to install packages, # note the > for creating the file, # note the >> for appending the file
RUN  echo " library(devtools) " > /tmp/packages.R && \
     echo " library(install.load) " >> /tmp/packages.R && \
     echo " install_load('quantmod', 'PerformanceAnalytics', 'htmltab', 'devtools') " >> /tmp/packages.R && \
     echo " devtools::install_github('jbryer/DataCache') " >> /tmp/packages.R && \
     Rscript /tmp/packages.R


EXPOSE 3838
CMD ["/usr/bin/shiny-server.sh"]